BCD HDi Remote Commands | BCD Associates
BCD HDi Remote Commands
Use Crestron®, AMX®, your computer, RS-232 serial, or Telnet via IP.
The BCD HDi remote commands are the same for TCP/IP and for Serial.
WakeOnLAN
Turn on power remotely using any WOL sending program. Enabled by system BIOS.
TCP/IP Remote
Find Your IP Address Automatically
It's easiest to let your network router assign an IP address to the HDi.
You can also assign IP IPV4 Address, Static Network Mask and Static Gateway Route Gateway manually, but DHCP is a lot easier. You generally don't need to ask the IT people.
Press the Menu button, then Up Arrow until you see "Network Configuration. Right/Left arrow to see Use DHCP.
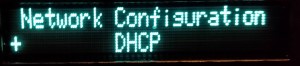
Press Enter and wait about 20 seconds for the HDi to receive it's IP address from your router.
Then you'll see something similar to

In this case, the IP <addr> is 192.168.1.13.
Connecting via Telnet.
From a Windows command window type telnet 192.168.1.<addr> 3021
3021 is the 'port' address. You'll need to know both for the Telnet program.
When Telnet connects, you'll see the BCD prompt character ">".
The prompt ">" means that it's ok to send remote commands.
>
Type "help" to see the list of commands:
>help
For more information enter 'help help' or 'help name' with name from:
baud burn deck dele dnum echo ecof econ eras exit fram help info list mark
mode open paus play powr quit recs reje rlse save stop thru vers zero
>
Type "help help" to see expanded explanations of the commands
>help help
baud: show/control serial baud rate - baud 0 means network
burn: burn 0|'data' or 1|'text' or 2|'icon' for video dvd to burn marked files to disc
deck: select the active deck in multi-drop serial configuration
dele: delete video files by name or number or marked files
dnum: set the deck number for multi-drop serial configuration
echo: show/control echo of commands 0|'off' or 1|'on'
ecof: disable echo of commands, alias for echo 0|'off'
econ: enable echo of commands, alias for echo 1|'on'
eras: blank/erase an optical disc
exit: exit the command parser, alias for quit
fram: display the current play/record frame number (during Record or Play)
help: show command help
info: developer/debugging status information
list: list available video files
mark: mark, unmark or list marked video files by name or number, 0 to unmark all
mode: show the current deck transport mode, e.g. PLAY
open: open the optical drive door or eject the disc, alias for reje
paus: pause playback or record.
paus or the Pause Button also toggles E-E Video Loop Through
play: play a video file by name or number
powr: power off the deck
quit: quit the command parser, alias for exit
recs: record video with either timestamp or user supplied name
reje: eject the disc or open the optial drive door, alias for open
rlse: release paused playback or record and continue
save: save preferences to non-volatile storage
stop: stop playback or record
thru: set E-E Loop Through 0|'off' or 1|'on'
vers: Display the firmware version
zero: Set the frame number to zero
OPERATION
- All commands are 4-characters.
- Press your computer keyboard Enter key after each command.
Type 'recs' (without the quotes) then pres your keyboard Enter keyto Record
Type 'stop' to stop.
The 'play' to play the most recently recorded file.
"list" will list the recorded files and assign a number to each.
>
>list
1 2015Sep04_20.05.25.mpg 37M
2 2015Aug29_20.12.59.mpg 287M
3 2015Jul27_19.59.23.mp4 4M
4 2015Jul27_00.04.32.mp4 108M
5 2015Jul26_23.45.05.mp4 2M
play 2 will play file number 2
play <filename> will play that file
mark
'mark' marks files for further action
'mark1' marks file #1. 'mark 5' marks file #5
'mark 3' marks file #3
Use 'mark 0' to unmark all the files.
Now you can:
'dele' to delete those market files
burn
'burn' these files to a DVD disc (-R,+R, +RW)
'burn 0' or 'burn data' just copies the files as files, "as is" to the disc
'burn 1' or 'burn text' makes a DVD-Video disc with a text menu
''burn2' or 'burn icon' make a DVD-Video disc with a moving video menu